Sunday, March 9, 2014

Cthulhuween 2012: They Came From Out Of Space!

I've  posted before about the semiannual (that's twice a year,) Cthulhu Mythos-based RPG one shots that I run at Halloween and then again In May (in honor of my wife's and my birthday.)  I have used a variety of rulesets (mostly modified D20 these days,) and a dizzying array of settings and themes, but always tying the story into the Mythos.

For several years I wanted to do a 1950's B-movie style adventure, complete with plenty of alien invaders, giant insects, and other tropes of the era.  But I could never get the story to gel, so I shelved it until a truly coherent story could come together.

Well finally I found my angle a couple of years ago and made it happen.  Although I had originally thought of using the Mi-Go as the 'bug-eyed aliens' in the story (they really are the go-to aliens for many of my games,) but in the end I found a better candidate in the Elder Things.

The story served as sort of a sequel to "At the Mountains of Madness."  At the end of that story, the Elder Things are awakened (along with their rebellious shoggoth servitors,) but their final fate is never discussed.  I figured they would set about to reclaim their dominion over the Earth, and for that they would need a new (more stable and loyal) shoggoth army.

It seemed reasonable that the shoggoths would have been based on an initial prototype (the Ur-Shoggoth, if you will.)  This primordial creation, (which may have been at least in part responsible for the development of subsequent life on Earth,) could have been discarded and abandoned after it was used as the basis for the later thralls (who would eventually rebel.)  A pair of Elder Things from the awakened contingent set forth to find this abandoned prototype and recover it, so that new servitors could be created (with corrections made to avoid their prior errors.)

So my story revolves around this pair of aliens searching for the remains of the Ur-Shoggoth.  They have tracked it to a small town in Midwestern America called Tranquility, where it has been buried for eons.  They have come in a hastily cobbled-together aerial craft (saucer-shaped, natch,) and have been scanning the area with their revita-ray to attempt to activate the shoggoth's protoplasm.

Of course, since the shoggoth is buried in the earth, bits of that protoplasm, with its otherworldly properties of vitality, have made their way into the food chain, from earthworms up through larger, predatory insects, through the principle of biological magnification (look it up or marry a scientist like I did.)  When the revita-ray hits any bugs that have this protoplasmic matter, it causes a dynamic transformation, causing them to grow to phenomenal proportions!

These giant bugs, (along with flying saucer sightings,) have terrorized the people of Tranquility, and have even brought out the U.S. Army to investigate.  And that is where the story begins, as a handful of townsfolk find themselves in the middle of the town, overrun by giant ants.  They must make their way to the town hall, which seemed to be the only safe place, since the town air raid siren located there somehow repelled the ants.  Once they get there, they can hopefully get some answers, but first they must cross the town square…


The players started on this end of the table, surrounded by giant ants.  They had to get to the town hall, which was located here:

This meant avoiding or fighting the ants, who would continue to appear from the side alleys.  The table itself is a flocked battle board intended for wargames like Warhammer.  To make it compatible with a grid-based game like D20, I used my home made grid board, which is a sheet of plexiglas that I scored (by hand, mind you,) to a 1"grid.  'Cos that's how I roll.

For the ants, I ordered some party favors online for real cheap.  Then I sprayed them red with cheap spray paint, and then dipped them in floor varnish (a trick I'd wanted to try on skeleton armies for a while, and finally got around to trying.)  They turned out okay I think, and I painted their eyes black to give extra menace.


I also got to modify some Pixar Cars vehicles to fit the time period:

A great delivery truck from the "Blast Off" line, and "Brand New mater, which got a new grille and number, as well as some stake sides made from  coffee stirrers.

28mm cars, Fallout
The two on the left are Finn McMissile, with putty modifications, and the Sheriff's car was an M2 1948 Mercury repainted and with a red bead added for the dome light.

28mm cars, Fallout
I made some big fins for the roadster on the left, while the middle one received more extensive modification (more on that car when I talk about my Fallout vehicles…)

The characters all started in pairs, and had to work together to survive.


The buildings are all from various sets of a toy line called Farm Country from Ertl.  These are remarkable sets, and I got them all on ridiculous markdown at local discount stores and closeout toy stores years ago.  They are quite useful as terrain pieces, although they are somewhat baffling as children's toys (what kid wants to play with a John Deere dealership playset?)


The bank and Hotel are from the "Cow Town" set, which features Old West style buildings, but they work well as a 1950's era main street as well, I feel.  The eagle on the bank was a wooden decor piece from the craft store, and the signs were simply printed out and stuck on with rubber cement (they are not the neatest, but I ran short on time.)


More Tranquility businesses.


The town hall was modified from a modern dairy barn playset (again, what kids were the target demographic for these?)  The doors were stuck on, and the clock is a Heroclix base with the face drawn in pen.  I tried to evoke the town hall from Back to the Future with this one.


The movie theater is my favorite piece!  It was another copy of the hotel (I have two Cow Town sets,) and I'm really proud of how it turned out.  I stuck the fanlight shape above it to look like an old-style marquee, and printed up the now showing list and the posters.


A close-up of the posters, which all contained clues of what the party would face (giant ants, mesmerized townsfolk, aliens in their saucer, and the Ur Shoggoth.)  Also?  Them! is one of my favorite monster movies of all time.  You should really check it out.  It is THE 1950's monster movie.

For the minis, I used a lot of Heroclix (no surprise,) as well as some others I had lying around.  Let's meet our cast, shall we?


Here is local punk Vinnie Bester, and the bumbling Deputy Anderson (all the characters were given the last names of famous 1950's sci-fi authors.)  Vinnie is Rick Jones from Heroclix with a repaint and a switchblade made from putty, and the deputy is from the "Last Night on Earth" board game.  There was a smudge on my camera lens for all of these photos, and I'm too lazy to reshoot them.  Sorry.


Old Doc Smith (get it?) and Private Sturgeon (the guys all call him Fish.)  The doc is an ancient Call of Cthulhu mini from RAFM (in lead, no less!) while the private is a Heroclix Easy Company Medic.


Salesman extraordinaire Frank Kuttner and Professor Matheson of the local university.  Both are Heroclix: the professor is  Bruce Banner, while Frank is DC villain Bruno Mannheim, with hand-painted atrocious jacket pattern (with 'matching' powder blue slacks, because Frank is a real fashion plate.)


Farmer Clarke and high school good girl Jenny Blish.  Since these two had a fair bit of modifications, I thought it would be cool to pose them next to the Heroclix I used.  Lex Luthor had his prison jumpsuit turned into overalls by addition of front and back panels, as well as shoulder straps (I'm quite proud of the buckles, particularly,) as well as a straw hat, all out of putty.  Lex's bodyguard Mercy Graves had her extremely mini miniskirt lengthened with putty, and her strappy sandals filed and modified into saddle shoes and bobby sox.  I added to her shades to make them appropriate for the era, and clipped off her braid and replaced it with a ponytail out of putty.  The bow is actually dental tape (a freaky kind of floss alternative) with the wax scraped off (it's good to use for straps and such.)

Once the party made it to the town hall, they learned that the rest of the town was spotted out in a field, doing some kind of excavation and acting like zombies.  They knew they had to get out there next.  But the ants were now everywhere, and the only thing keeping them at bay was the sound of the air raid siren, which was too big to move.  They knew however, that there was a similar siren on the town fire engine, so the only way for them to get out to the field was to make it back across the square to the fire station.  But how to avoid all those ants?

This is one of my favorite innovations I have done, and frankly I was amazed at how well it worked.  I wanted them to hop from roof to roof, and be attacked by giant spiders along the way.  But the roofs of the buildings are all peaked, which would have made grid combat really tough.  I spent some time looking at how to makes flat roofs, including just putting Dungeon Tiles down on top, but nothing really worked.  Then I remembered the immortal words of the Insane Clown Posse and thought: motherfucking magnets.

Pictured: motherfucking magnets.

I had some neodymium magnets I was going to use for 40K (the less said of that the better,) and started gluing them under the bases.  For the deputy, I happened to have a rare earth magnet that I scavenged from a broken phone case (never throw a magnet away!) that fit perfectly under the mini's original base, and then just glued a separate base beneath it, it was plenty strong enough to work though it.  But how to magnetize the roofs?  I went to my local hardware store (okay, to my local hardware store's website,) and found metal roof flashing pieces that were the perfect size for the roofs!  I glued two in place under each roof, and merely had to snip each one a little and bend them to fit the supports underneath.

Then I used a ruler to mark the roof to create a grid and voila!


Now I could have a fully-3D rooftop battle!


The characters and the spiders (from the D&D Castle Ravenloft board game,) stayed put nicely, and the PC's had to fight the arachnids and make multiple jump checks to pass from roof to roof.


The deputy missed one of those jumps, and had to make a climb check to scramble up before he was mobbed by ants.


He failed.  The roof of the truck was magnetized as well, by the way.

Finally they made it to the fire station.


Then they hopped on the truck, which had metal plates added so the whole party could be stuck on securely.


The truck was the deluxe version of "Red" from the Cars line, which I've discussed before.  I used putty to cover over the eyes, and part of Mater's tow apparatus was turned into a winch to cover the mouth.


I very conveniently had a metal plate the exact color (it came with some rare earth magnets I picked up at Target years ago.  Never throw anything away!)

When they got to the field, they found the flying saucer (a Lost in Space model,) guarded by mind-controlled soldiers.  After much deliberation over stealth approaches, they finally decided simply to run them all the hell over with the fire truck.

Disclaimer: This blogger does not in any way condone vehicular violence against the proud members of our nation's armed forces, even when under alien mind control.

Then they entered the saucer to do battle with one of the Elder Things!


Now this was a bit of a last minute sculpt, so be kind in your assessment.  I sculpted the foot out of putty, which turned out great, and then the head as well.  The body was based on an oblong bead with putty over it, forming the ribs.  The arms (of which I realize there should be more, but it would have made the mini too big,) were twisted paper clips.  The paint job could really use a touch-up…

They defeated the thing, and then headed into the pit that the townsfolk had been forced to dig.  The Elder Things had located the resting place of the Ur-Shoggoth, and dug down to it.  The other Elder Thing was down there, using the revita-ray to try and awaken it fully.  by this time, the party was reduce to the two least combat-effective members; the professor and Jenny.

Things don't look too good our heroes...

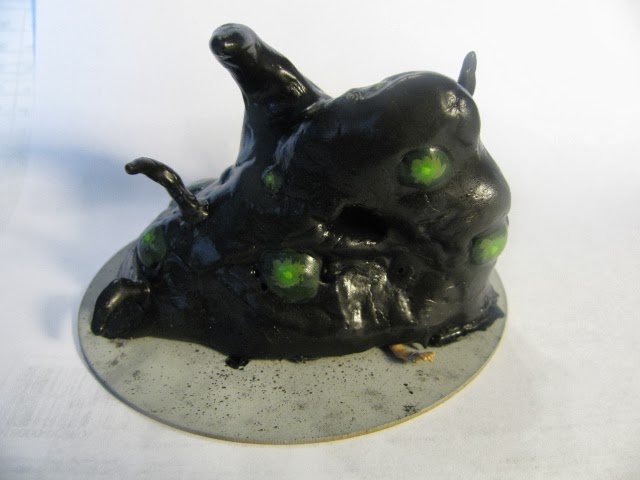
The last alien was defeated, but at the cost of the professor's life.  Unfortunately, the Ur-Shoggoth was roused, and emerged from its earthen tomb to feed!  With only Jenny left, things looked grim.

Alas, poor Jenny...

The Shoggoth itself was made from Crayola Model Magic, with wooden beads of assorted sizes set into it for eyes.  Then I covered the whole thing in black Plasti-Dip to give it that perfect slimy sheen.  Then I painted the eyes and mounted it on a 3" wooden circle a friend had cut for me.


Luckily, Jenny was actually the host for a member of the Great Race of Yith, who had made a plasma blaster from her hair dryer, and was able to dispatch the half-formed monster.  And the day was saved…for now.

Monday, January 6, 2014

Fallout Miniatures Part Four: BIG Super Mutants!

Not too long ago I write a little post about how to make super mutants.  But as you know, super mutants come in a variety of shapes and sizes.
From left to right: Super Mutant (base model,) Brute, Master, Overlord and Behemoth

The basic super mutant (discussed previously,) stands a head or so taller than a standard human.

Fallout super mutant tabletop miniatures
Bear in mind that our hapless hero in this picture, Mildly Annoyed Max, is a rather tall fellow.
But as you go up in power (and threat) level, they get larger and larger.  On your tabletop, you will no doubt wish to reflect those differences.  When you put out a larger mini, players react appropriately, perceiving the greater threat from the larger mini.

So for my game, I have five distinct sizes of super mutant minis: basic, Brute, Master, Overlord and, if the situation calls for it, a single Behemoth (but that will be for a separate post.)

Now, obtaining all these differently-sized minis may require some clever shopping and/or modification. Obviously scale is the most important factor when looking for larger minis, and you will certainly want to find figures that are all in scale with each other.  What I did, was to examine my options and select sizes for the different types.  So I have four size categories: super mutants (mostly "Handful of Heroes" Hulks and other clix minis,) Brutes, which are slightly larger, then the Masters, which are even larger, and then the overlords, which I made truly huge, towering over the rest of the minis.

I should also point out that I am of the "go big or go home" school of thought, so I want my super mutants to be imposingly large.

To start with, the brutes are only slightly larger than the stock mutants, and are usually better armored.  I tend to use the slightly larger heroclix hulks for this, and keep the smaller ones for standard mutants.  Most of these require little to no conversion, beyond scraping off the hair and a weapon swap, just like the standard sized guys.

Fallout super mutant tabletop miniatures
Red Hulk here is larger than the baseline super mutant already, and will make a fine brute, and a credible threat for Starting To Get A Bit Cross Max.
But sometimes, I have a smaller figure, and I want to give it some additional height.  This is especially true with the Hulk figures from the Handful of Heroes Line, as they tend to be rather hunched over and squat, such that I have some raider minis that are actually taller than the super mutants

When you have a mini that you want to make taller, there are a few techniques you can use to add height.  The most common method is to simply build up the figure's base, and hope nobody looks too closely.  Another is to try to twist a crouching mini's posture to make it look taller, or bulk up its shoulders with armor or pads.

But those tricks are decidedly unawesome, so I'm not going to talk about them.  Instead, I'm going to talk about physically adding height to the mini itself.  This involves some cutting, some pinning, and some sculpting, but it's not too difficult, even for beginners.

This method will not only make a mini taller, but can also alter the proportions, making an otherwise misshapen figure look more realistic, which is great when converting comic book style characters into more realistically proportioned video game designs.

Incidently, there is a whole subset of the Warhammer 40K community who do this with their Space Marines(TM) to make them more human-looking.
They call it "true scale" and it makes a real difference, feel free to check it out!

Let's start with a Hulk from the "Handful of Heroes" line.

The ugly one; on the left.

This fellow is the "Hulk as War" version , which apparently happened. I haven't read Marvel in years, so apparently Apocalypse got to the Hulk?  I don't know.  But I digress.  He has some decent armor, that can easily be made to look like scrap armor (the thing on his chest looks like the plate of an old calculator.)  But the freaky tentacle and Jai-alai sports gear gotta go, and he is simply too short to be a super mutant Brute.

So he's for the chop!


Using a craft knife, I sliced the arms off right at his shoulder pauldrons, and selected some new arms to replace them, in this case, 40K ork arms holding an "assault rifle."  Now we look at where we want to add height.  The easiest place to do this is at the waist, so I cut him as evenly as possible straight across above his belt.

This allows me to add a couple of scale inches in height, by creating a gap and filling in that space with putty.  To start, I drill two holes in the upper torso, as you can see in the photo above.  Using two pins instead of one makes the join much more stable.  To make sure that the holes on the lower half match up, I used an old trick of dipping the ends of the pin in paint and then press them where I want them to line up.  Then I simply drill the holes where the paint marks are.

Genius!


Then I have to make sure that the pins are the correct length, so that it leaves a gap of the width I want between top and bottom.  Using green stuff, I fill that gap completely.  You can sculpt that bit of green stuff at this time, but I prefer to let that dry completely, and then sculpt additional putty over that. 

For this mini, I later decided to make him even taller, so I also created extensions on his calves, which are one of the other places you can add height.  I sliced him evenly, re pinned the legs, and added putty which I then went back over and sculpted shinguards (yay shinguards!)
 
This is before I added the shinguards.
The end result is a previously short mini that now stands taller than the baseline super mutants, and is suitable for a Brute.

Fallout super mutant brute tabletop miniatures
Complete with freaky "axe-face" helmet and welding mask shin guard (yay shinguards!)

Fallout super mutant brute tabletop miniatures
From the back.  You can see the wide belt that hides the 'extension' we made to his waist.

Fallout super mutant brutes tabletop miniatures
Greater peril for Rather Put Out Max.
The next class of mutants are the Masters, which I feel should be suitably large, edging into the 'giant' range.  For them, I use the biggest of my 'normal sized' minis, notably the bigger Hulk figures.  Sometimes, a figure is still a little lacking in height for my tastes, and so said mini will get the 'Ethan Hawke in Gattaca' treatment.


Then he too gets shinguards (yay shinguards!) and whatever other modifications are needed.

Fallout super mutant master minigun tabletop miniatures
Like a minigun.
Fallout super mutant master minigun tabletop miniatures
Although my campaign is in Texas, and that would mean quite a trek for this fella, I couldn't resist the reference.

But I wanted to make a truly impressive super mutant master, starting with the GW ogre body.  Now, in my previous post, I pointed out that the fantasy ogres are oddly proportioned, being both stocky and rather zoftig.

So this means more modification!  Here is the ogre's body as it comes on the sprue:
The reason his feet look tiny is because they fit into pointy shoes

To begin, I had to get rid of the big hole in his gut, as well as all that extra adipose tissue.  I shaved away his love handles and man boobs, and then filled in the hole with a tissue (it was nearby.)  I covered the hole and the shaved chest with putty and sculpted pecs and abs (I always said the only way I'd get a sculpted physique is if I sculpted it myself.)
I also added the compulsory gas tank codpiece.
Next I snipped off the feet below the ankles.  I then actually scraped off the knee with an Xacto knife, so that the cuffs of the pants will become the band of a knee pad, and the baggy pants become baggy shorts.  This allows me to sculpt entirely new feet and shins, conveniently covered in armor, of course (yay shinguards!)

Then we add appropriate head and arms, taken right from the ogre bulls sprue, and voila!  My super mutant Master.

Fallout super mutant master bumper sword tabletop miniatures
Everything below the knee was made from putty over paperclip armatures (legatures?)

Fallout super mutant master bumper sword tabletop miniatures
A better view of his legs, and my attempt at a bumper sword.

Now this is a pretty extensive conversion, so many of you might not want to go to such extremes.  There are of course less work intensive conversions that we will take a look at, but I would like to point out that super mutants are meant to be big and scary.  Spending a little time and effort (but still not too much money,) on a few can pay off when you pop them on the table.

Fallout super mutant masters tabletop miniatures
Highly Displeased Max is feeling nervous.
Speaking of big and scary, for my money, super mutant overlords are the second toughest monsters in Fallout III.  Behemoths might be big and scary, but there are only five, and each of them are encountered in a situation where clever strategy and good weapons can help you.  Overlords can be found everywhere once you are high enough level, and they can be found in mobs.  I freaking hate those guys (ghoul reavers are the #1 toughest monsters by the way, because you only ever face them in tunnels, where it is hard to kite them or use a Fat Man.)

So I reckon they deserve a truly imposing figure on the table.  I will probably never use more than one or two of them at a time, so I only require a few minis of them.  Luckily, I had three minis of this guy:


That is Atlas, a member of the Marvel Comics team The Thunderbolts, and before that the villain Goliath.  As you can see from the picture, he is a true giant,  standing at least twice the height of the average mini.

As soon as I saw him, I figured he'd make a great towering super mutant overlord.  The hair had to be pulled out and the head puttied over, and the face needed scraping to get rid of the weird face mask thingy (I know; the 90's, right?)  Then I was free to modify all the various details.

Fallout super mutant overlords tabletop miniatures
Like giving them 'angry mouth.' 
Fallout super mutant overlords tabletop miniatures
The straps had to be sculpted, and I thought one of them having a Nuka Cola cap belt would be funny.
As you can see, arm swaps, a clever concealing of the freaky moon boots on one of the figs, and some road sign armor, and now Messrs. Josten and Josten are ready to really ruin some vault dwellers' day.

Fallout super mutant overlords tabletop miniatures
Now he's Mad.
There are a few other 'giant' minis in the Heroclix line that could be made into overlords as well, such as Black Goliath, Yellowjacket or Super Adaptoid from Marvel, and one or too from DC as well (looking at you, Colossal Boy.)  But you can also find toys and plastic figurines from other lines (usually of the Hulk, or some other hyperthyroid superhero type,) that can be painted up and are the right scale for overlords, since they are meant to be so large.

At this point, I should bring up the skin color issue again.  When discussing super mutants, many tend to forget about Nightkin.  Any super mutant can be converted into a Nightkin simply by palette-swapping them with bluish-purple skin.  Usually one only finds Nightkin of a size comparable with base model super mutants, or perhaps brutes and masters, you can use the same guidelines to whip up a batch of them easily.  But that will have to wait for another post.

I have actually considered casting some mutants of my own in clear resin, so I could make some Nightkin cloaked by Stealth Boys.  Or if I ever see some clear Hulk figures, I will snatch them up immediately for conversion.  Oh well, until them, I will just paint up some super mutant characters in the appropriate purple tones to use as uncloaked Nightkin.

So there you have it, a variety of different super mutants.  Here is a size comparison chart of my various mutant figures.

Fallout super mutants tabletop miniatures


And the behemoth?  He's around here somewhere…

Fallout super mutants tabletop miniatures
???